Automating File/Folder Deletion


As promised in my last post, here is a sample batch file for automating deletion of files or folders.

For a tutorial on setting up a task in Windows Task Scheduler – please see the following previous post:

Assuming you have set up your temporary file structure as suggested in my last post, save the following code in a .BAT file and set up an automated task to run it as a program on a scheduled.


REM CD C:\TMP\
RMDIR /S /Q C:\TMP\

REM CD C:\TEMP\
RMDIR /S /Q C:\TEMP\

REM CD "C:\Users\USERNAME\AppData\Roaming\Macromedia\Flash Player\macromedia.com\support\flashplayer\sys\"
RMDIR /S /Q "C:\Users\USERNAME\AppData\Roaming\Macromedia\Flash Player\macromedia.com\support\flashplayer\sys\"

REM CD "C:\Users\USERNAME\AppData\Roaming\Macromedia\Flash Player\#SharedObjects\"
RMDIR /S /Q "C:\Users\USERNAME\AppData\Roaming\Macromedia\Flash Player\#SharedObjects\"

PAUSE

You will need to update the code with your username in the 4 places that say “USERNAME”.

This code will delete all files in the C:\TEMP & C:\TMP folders as well as cleanup after Macromedia’s Flash Player which I find tends to leave quite a few temporary folders and files behind.

When the code runs, it will pause at the end for you to review its progress until you press any button.

Happy New Years!

Temp Files Cluttering Your Hard Drive? Consolidate!


Note: The following instructions are for Windows PCs and should be pretty consistent for both Windows XP, Windows 7 & Windows 8.

Your computer stores temporary files all over the place. Sometimes it is smart enough to clean up after itself – most of the time it’s not.

If you direct your main temporary directories to point to one location it will make it much easier to manage cleaning up these temporary files.

Anytime I setup a new computer (or help a friend), there are 3 main temporary directories which I re-point.

  • C:\Windows\TEMP
  • C:\Windows\TMP
  • C:\Users\\AppData\Local\Microsoft\Windows\Temporary Internet Files where is your Windows log on username.

Before we begin, navigate to the folders above and delete as much out of them as Windows will allow (if there are any files it gives an error for, select the “Skip” option.

To re-point the following temporary directories:

  • C:\Windows\TEMP
  • C:\Windows\TMP
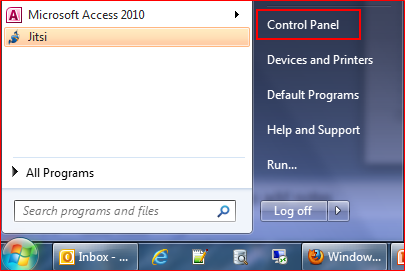
  1. On the start menu, open the Control Panel
  2. Start_Menu_Control_Panel

  3. In the top right of the window, there is a drop down menu called “View By”. In the drop down, select either Large or Small Icons (depending on your viewing preferences)
  4. small_icons

  5. Select “System” from the list
  6. On the left hand side of the window, select “Advanced system settings”
  7. Advanced_System_Settings

  8. The window that opens should default to the “Advanced” tab. Click on the “Environment Variables” button at the bottom of the window
  9. Environment_Variables

  10. There are two sections in the Environment Variables window. The first are variables that are unique to your user profile on your computer. The second are System variables which are global and apply to any profiles that are on your computer.
  11. In each section there should be two variables (so 4 in total): TEMP and TMP
  12. For each variable, highlight it and click the “Edit” button
  13. Environment_Variables2

  14. In the pop up window, you want to type the folder location of where you want the variable to put it’s files. I like to have my TEMP files go into a TEMP directory right under my root (main) directory which is usually your “C” hard drive. So I type in “C:\TEMP”.
  15. edit_variable

  16. For TMP Files, I create a second folder called “C:\TMP”.
    The reason I like to keep them separate is that different programs use different folders and it can be easier to track down temporary files (if I need them) if I split up the files.
  17. When you are done inputting the new variable values, click the “OK” button.
  18. When you have finished re-pointing all 4 of your TEMP & TMP variables to their new location, continue click “OK” buttons until all windows are closed.

Re-pointing the Internet Explorer temporary directory:

C:\Users\\AppData\Local\Microsoft\Windows\Temporary Internet Files where is your Windows logon username.

  1. Open Internet Explorer
  2. ie_button

  3. On the menu bar, select “Tools” and then “Internet Options”. Note: If you don’t see the menu bar, hit the “Alt” button on your keypad and you should see the menu bar appear.
  4. In the Internet Options window, on the “General” tab, select the “Settings” button in the “Browsing history” section.
  5. ie_settings

    There are two things to change here:

  6. The size of Internet Explorer’s cache – a browser cache is where a browser stores local copies of web pages and pieces of web pages (such as pictures, videos, etc.) which you view. It cache’s these pieces so that the next time you visit that web site it will load quicker. In general, you will not notice a big difference in performance so long as you have a relatively fast internet connection, regardless of how big you make your cache. Therefore, I usually set my browser caches (this works for any browser, Firefox, Chrome, etc.) to between 10 and 50 mega bytes (MB).
  7. The location of the folder where Internet Explorer stores this cache of temporary files.
  8. In the “Disk space to use” box, input size of cache – I typically put 10 – I don’t think you need more than 50.
  9. ie_disk_space

  10. Click the “Move folder” button
  11. ie_temp_location

  12. Browse to the location of your new C:\TEMP folder and select it
  13. Click “OK”
  14. Continue to click “OK” – Windows will inform you that it needs to log you off your profile in order to move the folder. Select “OK” and it will log you off. Log back into your profile and your Temporary Internet Files folder will be moved into your C:\TEMP folder.

So now you have your main culprits of temporary files in one location on your hard drive.

You can either:

  • Manually go into these folders on a regular basis (once a week is fine) and delete all files in these folders (note: Windows will not allow you to delete all the files each time – if it gives you an error on a file, just click the “Skip” button)
  • Or you can set up a task and script to go and delete these files for you on a regular basis. I have a script that runs once a day to clean out my temporary files.

My next post will detail how to automate a deletion script.

Excel Filename Reference Length


I am finally getting around to posting this tip.

I came across an error while helping a colleague of mine a couple of months ago. They were trying to figure out what the easiest way was to update an Excel file that had many reference links to other Excel files. Every time he opened the main file & refreshed the connections, the formulas would give him a #REF! error message.

We eventually figured out that due to the huge folder structure he was storing everything in, the length of the filenames to the referenced Excel files were too long for Excel to digest! Since I had never come across this issue (probably because I always try to keep my file structure as flat and as short as possible), I figured it would be good to post about it to help others who might come across this error.

Microsoft support does have an article detailing this issue which you can read about here: http://support.microsoft.com/kb/213983

In summary, this is what you need to know about filename length:

If you save or open a file where the path to the file (including the file name) exceeds 218 characters you will get an error. This limitation includes three characters representing the drive (e.g. “C:\”), the characters in folder names, the backslash character between folders, and the characters in the file name. In addition, it appears that the file extension (e.g. “.xlsx”) contributes to the length of the filename when causing this error.

This behavior is based on a 256-character limitation in Excel for creating links to another file. This limit of 218 characters for the path name is based on the following:

Up to 31 characters in a sheet name.
Apostrophes and brackets used to denote the workbook name.
An exclamation point.
A cell reference.

For example, the path for a file might resemble the following:

c:\excel\personal\...\[my workbook.xls]up_to_31_char_sheetname'!$A$1

This behavior will also occur if there is a square bracket in the path.

Hopefully this will help encourage you to keep your file structure & file names as short as possible to avoid issues such as these!

Gaining Visibility in Enterprise IT Security


Hi All,

I’m pretty excited to announce that my first paper article has been published! Please check out my article entitled “Gaining Visibility in Enterprise IT Security”, co-authored with a client of mine, Jeff B. (no, his last name is not the same as mine 🙂 ). It was published in the Jabian Journal and is available online here: http://joom.ag/d42X/p60

Here’s the link to the entire contents of this edition of the Jabian Journal: http://www.jabian.com/jabian-journal/jabian-journal-fall-2013-main/

I would love to get feedback on it so please drop me a line or post something in the comments below.

Thanks!

~Yosef

Best Presentation Tips


Over the years I’ve given and watched my fair share of presentations. While I don’t believe I’m the best presenter in the world, I feel that at this point I have enough experience to give some decent advice.

The reason I decided to post this today is because I watched a couple of presentations last night during a competition and some of the presentations suffered from the get-go because the presenters did not follow very basic rules.

When I started to write these tips down, I wanted to start every sentence with “First & foremost” because it seemed like all of the points were the most important. To ensure a great presentation I suggest you follow all of them! 🙂

Know your content! How do you know if you know it well enough? First, you don’t need to look at your slides (other than maybe a quick peek to remind you which slide you’re on) and second, you can answer any questions your friends (who are helping critique your presentation) can come up with.

Have your content & delivery (of said content) peer-reviewed and of course practice, practice, practice!

Whether your presentation includes visualizations or not – walk around! Interact with the audience! Make sure you maintain eye contact (trick: Focus on those that are smiling back at you). One trick I learned from a seasoned presenter is – play a game with your self. See if you can make it to the back of the audience during your talk.

Obviously this depends on your location – if you’re on a stage facing a multi-tiered audience, I don’t suggest this or if you need a mic that’s not portable this isn’t possible. By walking around, you accomplish multiple things. It will make your audience feel more connected to you and more engaged. It also helps to give them something else to look at besides your slides – audiences can grow bored very quickly.

Remember that you are taking your audience on a journey. Whether it’s a technical journey to discuss the inner workings of string theory or a culminating presentation of the baskets you built during basket-weaving class – in order to keep your audience engaged you have to tell a story.

For Presentations with Visualizations:

  • Check ahead with whomever is responsible for setting up the room where you will be presenting to ensure that you will have the necessary equipment (e.g. lapel microphone, laptop, projector, etc.).
  • Come early to set up and double-check that everything is working.
  • If you will need internet access to show a video or demo a website, make sure you will have access.
  • When it comes to your content in the presentation – less is more. I know there are multiple trains of thought about this but in my experience, keep it simple. Pictures are worth more than words (I’m trying not to fall back on any clichés 🙂 ), and bullets are certainly better than paragraphs!
  • Make sure you are comfortable with whatever technology you are using. In the presentation last night – there were a few presenters that did not know how to use PowerPoint. Make sure you know how to:
    • Put a presentation in Slide Show mode (F5)
    • Restart a presentation at the current slide (ALT+F5)
    • Use a presentation remote/clicker (i.e. you have to be in presentation mode for the clicker to work, etc.)

I realize this isn’t a comprehensive list and you probably won’t be able to go out and give a TED talk after reading this. That being said, if everyone followed these points, presentations would become a lot more enjoyable to sit through and you as a presenter will feel much more comfortable in your role.

No more horrible presentations! Please share your best presentation tips below!