Block all Windows notifications when Screen Sharing


I see it all the time – someone is sharing their screen during a meeting and an email notification pops up, usually to the audience’s amusement and the presenter’s chagrin.

There’s a simple trick you can do to block Windows (and Microsoft Outlook) from interrupting your screen sharing.

  1. Open the Windows (Start) menu and type “Present”.
  2. Select the first item titled “Adjust settings before giving a presentation”
  3.  

  4. Click the check box at the top of the window that appears “I am currently giving a presentation”
  5.  

    This will add the following icon to your icon tray:


  6. When you are done presenting, simply right-click on this icon and select “Stop Presentation”
  7.  

Good luck with your presentations!

Automating File/Folder Deletion


As promised in my last post, here is a sample batch file for automating deletion of files or folders.

For a tutorial on setting up a task in Windows Task Scheduler – please see the following previous post:

Assuming you have set up your temporary file structure as suggested in my last post, save the following code in a .BAT file and set up an automated task to run it as a program on a scheduled.


REM CD C:\TMP\
RMDIR /S /Q C:\TMP\

REM CD C:\TEMP\
RMDIR /S /Q C:\TEMP\

REM CD "C:\Users\USERNAME\AppData\Roaming\Macromedia\Flash Player\macromedia.com\support\flashplayer\sys\"
RMDIR /S /Q "C:\Users\USERNAME\AppData\Roaming\Macromedia\Flash Player\macromedia.com\support\flashplayer\sys\"

REM CD "C:\Users\USERNAME\AppData\Roaming\Macromedia\Flash Player\#SharedObjects\"
RMDIR /S /Q "C:\Users\USERNAME\AppData\Roaming\Macromedia\Flash Player\#SharedObjects\"

PAUSE

You will need to update the code with your username in the 4 places that say “USERNAME”.

This code will delete all files in the C:\TEMP & C:\TMP folders as well as cleanup after Macromedia’s Flash Player which I find tends to leave quite a few temporary folders and files behind.

When the code runs, it will pause at the end for you to review its progress until you press any button.

Happy New Years!

Temp Files Cluttering Your Hard Drive? Consolidate!


Note: The following instructions are for Windows PCs and should be pretty consistent for both Windows XP, Windows 7 & Windows 8.

Your computer stores temporary files all over the place. Sometimes it is smart enough to clean up after itself – most of the time it’s not.

If you direct your main temporary directories to point to one location it will make it much easier to manage cleaning up these temporary files.

Anytime I setup a new computer (or help a friend), there are 3 main temporary directories which I re-point.

  • C:\Windows\TEMP
  • C:\Windows\TMP
  • C:\Users\\AppData\Local\Microsoft\Windows\Temporary Internet Files where is your Windows log on username.

Before we begin, navigate to the folders above and delete as much out of them as Windows will allow (if there are any files it gives an error for, select the “Skip” option.

To re-point the following temporary directories:

  • C:\Windows\TEMP
  • C:\Windows\TMP
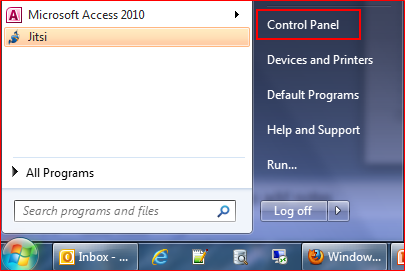
  1. On the start menu, open the Control Panel
  2. Start_Menu_Control_Panel

  3. In the top right of the window, there is a drop down menu called “View By”. In the drop down, select either Large or Small Icons (depending on your viewing preferences)
  4. small_icons

  5. Select “System” from the list
  6. On the left hand side of the window, select “Advanced system settings”
  7. Advanced_System_Settings

  8. The window that opens should default to the “Advanced” tab. Click on the “Environment Variables” button at the bottom of the window
  9. Environment_Variables

  10. There are two sections in the Environment Variables window. The first are variables that are unique to your user profile on your computer. The second are System variables which are global and apply to any profiles that are on your computer.
  11. In each section there should be two variables (so 4 in total): TEMP and TMP
  12. For each variable, highlight it and click the “Edit” button
  13. Environment_Variables2

  14. In the pop up window, you want to type the folder location of where you want the variable to put it’s files. I like to have my TEMP files go into a TEMP directory right under my root (main) directory which is usually your “C” hard drive. So I type in “C:\TEMP”.
  15. edit_variable

  16. For TMP Files, I create a second folder called “C:\TMP”.
    The reason I like to keep them separate is that different programs use different folders and it can be easier to track down temporary files (if I need them) if I split up the files.
  17. When you are done inputting the new variable values, click the “OK” button.
  18. When you have finished re-pointing all 4 of your TEMP & TMP variables to their new location, continue click “OK” buttons until all windows are closed.

Re-pointing the Internet Explorer temporary directory:

C:\Users\\AppData\Local\Microsoft\Windows\Temporary Internet Files where is your Windows logon username.

  1. Open Internet Explorer
  2. ie_button

  3. On the menu bar, select “Tools” and then “Internet Options”. Note: If you don’t see the menu bar, hit the “Alt” button on your keypad and you should see the menu bar appear.
  4. In the Internet Options window, on the “General” tab, select the “Settings” button in the “Browsing history” section.
  5. ie_settings

    There are two things to change here:

  6. The size of Internet Explorer’s cache – a browser cache is where a browser stores local copies of web pages and pieces of web pages (such as pictures, videos, etc.) which you view. It cache’s these pieces so that the next time you visit that web site it will load quicker. In general, you will not notice a big difference in performance so long as you have a relatively fast internet connection, regardless of how big you make your cache. Therefore, I usually set my browser caches (this works for any browser, Firefox, Chrome, etc.) to between 10 and 50 mega bytes (MB).
  7. The location of the folder where Internet Explorer stores this cache of temporary files.
  8. In the “Disk space to use” box, input size of cache – I typically put 10 – I don’t think you need more than 50.
  9. ie_disk_space

  10. Click the “Move folder” button
  11. ie_temp_location

  12. Browse to the location of your new C:\TEMP folder and select it
  13. Click “OK”
  14. Continue to click “OK” – Windows will inform you that it needs to log you off your profile in order to move the folder. Select “OK” and it will log you off. Log back into your profile and your Temporary Internet Files folder will be moved into your C:\TEMP folder.

So now you have your main culprits of temporary files in one location on your hard drive.

You can either:

  • Manually go into these folders on a regular basis (once a week is fine) and delete all files in these folders (note: Windows will not allow you to delete all the files each time – if it gives you an error on a file, just click the “Skip” button)
  • Or you can set up a task and script to go and delete these files for you on a regular basis. I have a script that runs once a day to clean out my temporary files.

My next post will detail how to automate a deletion script.

Microsoft Task Scheduler Tips & Tricks


I use Microsoft Task Scheduler for a couple of different jobs and over time I’ve found that different jobs require different “tricks” to get them to work properly. I’m going to try to summarize some of those tips & tricks here for you.

First though, I’m going to quickly sketch out how to create a simple task in Task Scheduler. If you are already comfortable with creating tasks feel free to skip to the Tips & Tricks section below.

As an example task – I will walk you through creating a scheduled pop-up reminder in Task Scheduler.

  1. In Windows 7 or Windows 8, press the Windows key to bring up your start menu/page and type “Task Scheduler”
  2. Open the program with that name
  3. On the right hand side of the window, click the “Create Task” button in the “Actions” list
  4. Type a name for your task in the “Name” field
  5. In the “Configure for:” drop down menu at the bottom of the screen, choose the operating system that you are using (for some reason on Windows 7, this menu defaults to Vista.)
  6. Select the “Triggers” tab along the top of the window
  7. Click the “New…” button
  8. Select from the various options what type of schedule you would like your task to run on. For this example, I have chosen to begin the task on a schedule, Daily, Repeat task every 30 minutes for a duration of “Indefinitely”
  9. Click the “OK” button
  10. Select the “Actions” tab along the top of the window
  11. Click the “New” button
  12. From the “Action” pull down menu, I have selected “Display a message”
  13. Title: Reminder!
  14. Message: Stand up & stretch!
  15. Click the “OK” button
  16. Select the “Conditions” tab along the top of the window
  17. Depending on the task, I usually deselect the “Stop if the computer switches to battery power” and “Start the task only if the computer is on AC power” options.
  18. Select the “Settings” tab along the top of the window
  19. Select the “Run task as soon as possible after a scheduled start is missed”
  20. Change the “Stop the task if it runs longer than:” option to 1 hour. This will keep a task from running in the background chewing up processing power if it fails to exit cleanly
  21. Click “OK”
    1. You now have a basic reminder set to go off every 30 minutes to help you keep your blood flowing while you read my long tutorials 😉

      Tips & Tricks

      Okay, now for some more detailed Tips & Tricks.

      1. On system start-up – if your task calls a batch job, and keeps failing to execute, you may need to grant your user(s) the “Logon as a batch job” permission
        1. To do so: In the Control Panel, open Administrative Tools, then Local Security Policy (Or simply type “Local Security Policy” in your start menu)
        2. Beneath Security Settings, open Local Policies and highlight User Rights Assignment
        3. Locate Log on as a batch job. Open the properties and add any users that need this permission
        4. When finished, save your changes and close the Local Security Settings window
        5. Your changes should take effect immediately. To make changes to the Domain Security Policy, on a domain controller, use the Domain Security Policy utility in the Control Panel
      2. Instead of choosing to start a task when the system starts, choose “At logon” with the check-box for “Any user” checked. Sometimes a program will behave better if you start it at log on instead of at system start-up.
      3. If you have a lot of programs that start at system start-up or user log on, you may want to stagger your tasks to start over 30 seconds or a minute after logon to try to give the computer a break between tasks. This can help keep your computer from freezing up, trying to start so many programs at once.
      4. Try experimenting with calling batch files on a scheduled basis. You can automate many different chores this way. Examples that I run including automating file backups, automating e-mail backups, reminders to stand & stretch, automatically start programs at logon, deleting temporary file directories on a regular basis, etc.

Enable Hibernation in Windows 7


So before we get started, here’s a quick background on the different shutdown options in Windows 7.

By default you have the two following options available, full shut-down and sleep. A full shut-down is just that – it shuts your system down fully, does not require any power and takes the most amount of time to reboot afterwards. Sleep simply stores your systems current state in memory and “shuts-down”. This requires power at all times in order to keep the system state active in the computer’s memory. If you lose power (e.g. your battery runs out) – you will lose any work that you left open when you put the system to sleep. On the plus side, starting the computer after putting it to sleep is almost instantaneous.

Another alternative is to hibernate. Hibernation is not enabled by default (hence this posting) but it’s a compromise between a full shut down & sleep in that it does not require power and it restarts quicker than after a full shut-down.

In order to enable this feature in your system:

  1. Open Command Prompt with Administrator rights. To open Command Prompt, type CMD in Start menu and then hit Ctrl + Shift + Enter to open the Command Prompt with Admin rights.
  2. Next, type the below command and hit enter: powercfg /hibernate on
  3. Type exit and hit enter to close the Command Prompt.
  4. If you can’t see the Hibernate option in Start menu then do the following tasks:
    1. Type Power Options in Start menu and hit enter.
    2. In the left pane, open the link labeled “Change when the computer sleeps” and then open the link “Change advanced power settings”.
    3. Under the Advanced Sleep option, expand the Sleep tree and turn off Hybrid Sleep.
    4. Now go back to Start menu to see the new Hibernate entry.

Once it is enabled, you should see the option listed under the “Shut Down” menu in your start menu (hit Windows key to bring it up).

Hibernate Option

Expanding the Windows 7 Taskbar Icons


Many people are now using Windows 7 and don’t realize how customizable it is.

One simple example is how to expand the Task Bar icons so that you don’t have to hover over each icon trying to figure out which Excel or Firefox window you want to open.

To adjust your Windows 7 Task Bar settings, right-click on an empty section of the bar and select “Properties”. In the window that opens, there should be 3 tabs with the default tab “Taskbar” selected. In the bottom of the first section of the Taskbar tab entitled “Taskbar appearance” there is a drop down menu entitled “Taskbar buttons:”.

The drop down has three options:

  1. Always combine, hide labels – this is the default option that only shows tiles for each program along the taskbar
  2. Combine when taskbar is full – this option will begin to combine programs into tiles when the taskbar begins to fill up
  3. Never combine – this option behaves like Windows XP and never combines programs into icons

Please let me know via the comments section below if something is not clear.

How to synchronize Windows 7 Clock with Internet Time Clock


For some reason, Windows 7’s clock is not set to synchronize with an Internet clock by default. In addition, it’s set to “synchronize” (with what, I’m not sure) only once a week, versus on a daily or an even more frequent basis. I typically like my clock to synchronize once every 10 to 15 minutes.

To address these issues – I’ve written up a quick tutorial.

To update the synchronization task to run every 15 minutes

  1. In the Windows 7 Start Menu Search Bar, type in “Task Scheduler” and open the associated program.
  2. In the Task Scheduler window there are 3 columns. In the middle column there is a section labeled “Active Tasks” with a list of tasks below. Double-click on “SynchronizeTime” in the list.
  3. In the window column on the left hand side, select the “Properties” button
  4. In the window that opens, select the “Triggers” tab.
  5. Highlight the trigger listed in the box and click the “Delete” button at the bottom of the window.
  6. Click the “New” button at the bottom of the window.
  7. In the settings section, select the “Daily” radio button.
  8. Set the “Start” time to be today’s date at 8:00:00 AM
  9. In the “Advanced settings” section below, select the “Repeat task every:” check box and choose your preferred repetition speed. I chose “15 minutes”.
  10. In the box to the right “for a duration of:” select “Indefinitely”
  11. Click the “OK” button.
  12. Click the “OK” button.
  13. Exit the Task Scheduler program.

To set the Windows 7 clock to synchronize with an internet clock

I prefer to set my clock by a time-server that is closest to me – in my case I use Georgia Tech’s US Navel Observatory’s Time Server tick.gatech.edu. For a list of USNO Time Servers visit the following link: http://tycho.usno.navy.mil/ntp.html Believe it or not, if you use a time-server that’s closer to you geographically speaking, your clock will theoretically be slightly more accurate. Weather this actually works in practice, I cannot tell you.

To set the clock to synchronize with the server of your choice:

  1. Open up Control Panel
  2. Select “Date and Time”
  3. Select the “Internet Time” tab
  4. Click “Change Settings”
  5. Ensure that the check box for “Synchronize with an Internet time-server” is selected
  6. Type the Server name you wish to use in the “Server:” box
  7. Click “Update Now” to make sure that the server name works. Should return back a success message when it is complete.
  8. Click the “OK” button
  9. Click the “OK” button

Windows 7: How to effectively use Sticky Notes


Windows 7 Sticky Notes – An awesome tool which utilizes many keyboard shortcuts.

For quick note taking, I use the built-in utility called “Sticky Notes” in Windows 7. This great little tool can actually be expanded upon through the use of special folders and keyboard shortcuts. Unfortunately Windows does not come with any instructions to figure these out but luckily smarter people than I have documented this on the web. Below is a synopsis on my favorite usages:

First off – to open the program – simply open the Windows Start Menu and just start typing “Sticky Notes”. This should pull the program up in the search results.

Okay – if you right-click on a Sticky note you can change the color of your notes to make it easier to identify them.

In addition, you can set up a special folder to view all your sticky notes as a list without having to open them up. On your desktop (or in a folder), create a new shortcut by right clicking and selecting “New” and then “Shortcut”. A “Create Shortcut” box will appear. In the empty white box titled “Type the location of the item”, copy or paste the following:


search-ms:displayname=Search%20Results%20in%20Sticky%20Notes%20(Windows%20Sticky%20Notes)&
crumb=&crumb=location:C%3A%5CUsers%5CYourUSERNAME%5CSearches%5CSticky%20Notes%20
(Windows%20Sticky%20Notes).searchconnector-ms

Note: Where it says YourUSERNAME – replace this with your Windows login name.

Click Next to continue. In the next window, type a name for this shortcut – keep it simple like “Sticky Notes”.
Click Finish.

Now here’s the cool part – you can assign a keyboard shortcut to open this special shortcut anytime. This will pull up all your sticky notes at once for you to view. Right click on the shortcut and select “Properties”. In the window that opens, select the “Web Documents” tab. Place your cursor in the blank text box entitled “Shortcut key” – now press the keys that you want to set to be the shortcut. For example, I want my shortcut to be “Ctrl + ALT + S” so in that order, I press (and hold) those buttons. The buttons should be recorded in the box. When you are done, release the keys and press “OK”. Now anytime you press that key combo it should pull up all your sticky notes.

Alternatively, you can add a shortcut to the program directly – instead of the whole search string above, put %windir%\system32\StikyNot.exe in for the location of the item.

Perhaps most importantly – to close (and save) your sticky notes, use the keyboard shortcut “Alt + F4”.

In addition to all this sticky goodness – you can also change your fonts and formatting on a sticky note using the following key combinations:

Ctrl + b – Makes text bold
Ctrl + i – Makes text italic
Ctrl + u – Makes text underlined
Ctrl + t – Make text struck through
Ctrl + shift + > – Makes text larger
Ctrl + shift + < – Makes text smaller
Ctrl + shift + L – To create lists or bullets, hit this key combination repeatedly to change between list types.