Picking an Anti-Virus Software


There are many different Anti-Virus software available for both PC’s & Mac’s (yes, Mac’s get virus’s too…) – the question is, how do you choose one?

Personally, I have had very good success with Avast! Anti-Virus software (www.avast.com/) however I also practice very careful internet browsing so I probably don’t attract the same number of nasty programs as your typical internet browser.

That being said, I recently did some research on Anti-Virus software and came across a great resource, a publication called Virus Bulletin (www.virusbtn.com). In reviewing their test results, I built an interesting graph that I think compares a lot of software in an easy to digest manner (click the below picture for a full size view):

Virus Bulletin Software Comparison - July 2015
Virus Bulletin Software Comparison – July 2015 (click to zoom)

I’ve highlighted in red two different software that I think are noteworthy, ESET & Microsoft Endpoint Protection (aka Windows Defender – per Microsoft’s statement of: “Most of our security software uses the same technology and offers the same level of protection.”).

ESET has been around a very long time and has been reviewed by Virus Bulletin for a total of 90 tests. It was not submitted for review for 4 test periods & failed only 2 tests. This by far, is the most impressive long-term passing streak of any of the software reviewed.

In contrast, Microsoft’s product has not been around for that long (roughly half as many test cycles as ESET). It has also not been submitted for review for almost half of the time it’s been being developed. That being said, of every test it’s been submitted for, it has never failed a test – all in all, pretty impressive as well.

I think that this type of visual depiction is very helpful for a quick comparison – keep in mind though that you should review Virus Bulletin’s methods to ensure that you’re comfortable with their testing strategy.

I hope these resources help – I would love to hear which Anti-Virus software you think is the best & why!

~Yosef

Personal Tips: How to keep your information secure


Disclaimer: Even the tips provided below cannot completely protect you. Work to develop your Security Mindset. Always remember, if you’re unsure if something is secure, ask!

In this post, I will highlight how a “Security Thinker” thinks, I’ll cover different avenues of attack including physical, personal, & digital attacks. Finally, I’ll spend a little time on how you can protect your data.

Becoming a “Security Thinker”

Ever picked up your car from the dealer after an oil change? The conversation probably went something like this…

Me: “Hi, I’m here to pick up my car…”
Customer Rep: “What’s your last name?”
Me: “Beck”
Customer Rep: “Got it, I see you in my list. I’ll have them pull your car right out front.”
Me: “Thanks!”

Great customer service? Or a massive breach in validating the real owner of the car?

How about this product?

SmartWater is a water-based, clear solution “paint” which is brushed or sprayed onto property, drying totally invisible. Each bottle contains the owner’s unique forensic formula (PIN) which is logged into a secure database so recovered property can be traced. The paint transfers to a thief’s clothing and skin, providing microscopic forensic evidence to prove the presence of the suspect at the time of the incident.

Let’s think about this for a second. Here’s a fun scenario…

I have a bottle of SmartWater and I’m over at your house. I really like your new TV… when you go out of the room to get me a beer, I brush a little on under the front corner. The next day, I call the cops to report that you stole my TV – and I have proof!

Good security product? Or easy way to legally steal?

Hopefully these stories highlight how a “Security Thinker” should think.

Avenues of Attack

Social Engineering refers to someone using psychological manipulation to get information from someone else. For example, you are working in a call center & someone calls and says “Hello, this is Yosef from IT, I’m working from home today and can’t log in, can you help me?” If you know Yosef, you may recognize that the person on the line isn’t him. Probably, you won’t know Yosef from Adam & if you are not careful, you may provide sensitive information without realizing it. To help protect yourself, here are a few tips:

  • Take off your employee badge or put it in your pocket when you leave the office. Anyone eating lunch next to your table can potentially gain all sorts of valuable information by looking at it such as the company you work for, your name, & even potentially your employee number & your title.
  • Do NOT share matters related to work, such as campaigns, products, services, complaints, or customers with people you don’t know.
  • Do NOT let unknown individuals into your office or a client’s office. Piggybacking is not allowed!
  • Double/triple check requests for confidential information – especially e-mail requests! A follow up phone call is good practice.

Another potential avenue of attack is your mobile devices. Now a days, your phone can potentially give someone access to your credit cards, your bank accounts, your social media accounts, and a variety of other information such as confidential documents, etc. Don’t forget your laptop or data thumb drive either! For all of these devices, follow these tips to be safe:

  • Use a login password.
  • Set password program to wipe your device if your password is improperly entered X number of times. Note – this may not be practical if you live with toddlers who like to press random buttons…
  • Setup a program to remotely wipe your device in case it’s stolen.
  • Encrypt your devices! Good encryption programs include Windows BitLocker, Apple LionVault, & GnuPG
  • Try not to leave mobile devices in your car unattended – and NEVER leave them in plain sight!

With regards to your phone, another avenue of attack is through software:

  • Only download apps that have been downloaded many times before (e.g. 1 Million+)
  • Understand the permissions that an app is requesting – does your flashlight program really need access to the internet?
  • Watch for battery to start draining quicker than normal – this may indicate that an unwanted app is running in the background.
  • Turn off features you don’t need such as: NFC, Android Beam, Bluetooth, picture geo-location tagging, & automatic uploading of pictures to Social Media sites.
  • Here are some Social Media tips for staying safe:

    • Be an adult. Don’t talk to strangers!
    • Don’t post information you don’t want others to know
    • Don’t friend strangers just to collect “friends”
    • If you get a friend request & you think you’re already friends with them, check!
    • Remember that you don’t know for sure who’s really on the other end of a chat

    For any of your computing devices, always make sure that you are keeping up with the latest security updates – this is for both your operating system & any software / apps. This is especially true for any programs that access or interface with the internet!

      • If you are on Windows, security patch updates include fixing vulnerabilities that Anti-Virus programs may not catch! Don’t postpone & if you have updates set to update automatically, shut your device down fully at least once a week to allow updates a chance to fully install.
      • Updating software includes updating any plug-ins – these may not update at the same time as the main piece of software. For example, if you’re running the Mozilla Firefox browser, you need to keep your add-ons & plug-ins up to date yourself.
      • Hopefully everyone already does this but don’t open e-mail attachments from people you don’t know! Always make sure your anti-virus program scans an attachment before you open it. Also, keep in mind that file extensions can be changed! A simple TXT file may actually be an executable file that will damage your computer!
      • Do NOT rely on anti-virus to keep you safe! If you don’t know what your anti-virus is prompting you to do try Googling/Binging the message &/or ask a friend!
      • Passwords: Do NOT share them! Do NOT use the same password for personal & work access. Make your passwords looooooong! Anything under 12 characters can be guessed by a computer program in just a couple of hours. If someone wants to get into your account they probably can but don’t make it any easier for them than you have to.

    Protect your Data!

    Data comes in all types & sizes, it can be your SSN, your phone number, address, contact list, work documents, financial information, etc. Tips for protecting your data include:

          • Log out of websites & IM services when you leave your PC
          • Instead of doing a simple delete of computer files that have sensitive information – use a shredding program (such as Eraser – http://eraser.heidi.ie/)
          • Shred your physical papers, credit cards, CDs, envelopes, receipts, etc. Anything that has sensitive information should be destroyed before putting in the trash.
          • Backup your data! Use hard backups such as making copies on an external hard drive, backup to the cloud (top rated backup program is https://www.code42.com/crashplan/)

    Remember! Just because you’re paranoid… doesn’t mean they aren’t out to get you! 😉

What’s new in Windows 10? (And whatever happened to Windows 9?)


Last question first – according to a Reddit poster (a reputable source of news I know…) the name Windows 9 may have been skipped due to lazy developers.

Apparently a lot of 3rd party products (e.g. non-Microsoft) may have checked the Windows version they were running on by looking for “Windows 9” to figure out if they were on Windows 95, Windows 98, Windows 98SE, etc. An easy way around breaking a bunch of old software was to simply skip to Windows 10. Certainly makes the most sense out of anything else I’ve read. 🙂

Now – what’s new in Windows 10?

Here are the highlights:

  1. Windows 10 is free to upgrade too for 1 year. After that, it’s a flat, up-front fee to buy the software – no annual fees (like Office 365).
  2. Microsoft’s version of Siri or “Ok Google” is called Cortana and it’s coming to all devices including your laptop. This means built-in dictation as well as interactive search, etc. May be a bit difficult to use in an open-cube environment but otherwise has a lot of potential.
  3. Universal Apps – the pipe dream of many end users is now a reality – developers will be able to build apps (aka “programs”) that run on any device including your phone, tablet, XBox, & PC. This means that regardless of what device you pick up, you theoretically can use the same app everywhere.
  4. Microsoft Edge – with Windows 10, Microsoft gets rid of Internet Explorer. To replace it, they have built a brand new internet browser called Edge which brings Microsoft’s browser into the 21st century. Not a lot of new functionality over other modern browsers (such as Chrome or Firefox), however one major update is the ability to literally draw on a web page and add notations, then share your marked up page with anyone. In addition, Edge comes with handy Cortana integration built-in which means that Cortana is constantly scanning the websites you are on to try to help you. For example you go to a restaurant’s website – Cortana will ask you if you would like to make a reservation. If you say yes, Cortana can initiate the call over Skype right from your browser.
  5. I don’t run in the hard-core gamer circles but for those of you with an XBox One, it can now send live gaming to your Windows 10 PC, allowing you to remotely play XBox One games anywhere provided you have your PC with you.
  6. For those Command Line power users out there (myself included of course!) the good old DOS prompt has gotten a much-needed face-lift. Text will now wrap, the window is fully adjustable to your screen, & you now have the ability to Ctrl+C, Ctrl+V into & out of the console!
  7. No longer limited to Microsoft applications, Windows Notifications are now accessible by 3rd party applications (such as DropBox, Google Drive, etc.) to let you know when events occur.
  8. You can pin the recycle bin to the Start Menu & Taskbar & finally delete it off your desktop!
  9. File Explorer now opens by default to a new “Home” screen that shows you any files & folders you’ve designated as favorites as well as your most frequently used files & folders.
  10. Windows has had the ability to give you multiple “virtual” desktops for quite a while. With Windows 10, you now get two key shortcuts to make switching quicker & easier. Win + Tab brings up an interface showing thumbnails of each of your desktops, allowing you to select one. Ctrl+Win+Right/Left will switch desktops in either direction.
  11. File History has been an on-again, off-again feature of Windows but is now standard in Windows 10. Basically it gives you a built-in time machine for accessing previous versions of files (provided you have it turned on).

All in all, I’m definitely looking forward to upgrading from Windows 8.1!

Excel PivotTable Slicer Options Explained


Microsoft has a great tutorial on how to use slicers to filter PivotTable data and I don’t feel that I need to duplicate their tutorial here. You can read all about it here: Microsoft: Use slicers to filter PivotTable data

What the article does not cover is the Slicer settings available by right-clicking on a slicer and selecting that bottom option “Slicer Settings”.

There are 3 main settings that you can set here – I typically only change the last one and leave the rest on their default settings. They are:

  1. Name – this is the name by which you can refer to the slicer in formulas. I typically just let this be the default. (e.g. CUBERANKEDMEMBER("PowerPivot Data",Slicer_Name,ROW()))
  2. Header – this is the name displayed above the slicer. You can choose to turn it on or off and customize the name if needed. Again, I typically just leave the header visible with the default name.
  3. Item Sorting and Filtering – Here’s where you can choose to:
    • order the values ascending or descending
    • Perhaps most important for visual aesthetics (and the value I typically choose to modify most often) you may hide items with no data
    • Choose to visually indicate items with no data (by making them more transparent)
    • Choose to show items, which have no data associated with them, last in the list
    • Continue to show items which have been deleted from the original data source table

Questions? Suggestions? Leave a comment!

Intro to the Excel VBA Editor


This post is not about learning to code, it’s about where to find your way around the basics of the Excel VBA developer interface. If you’re just getting started with VBA programming, this should help give you an idea of where to find the tools you need.

The topics we are going to cover today are:

  • How to enable the Developer tab in Excel 2007 and up
  • How to access VBA code and where to store your code
  • How to access the VBA macro recorder and why it’s useful
  • How to insert buttons in your spreadsheet and assign code to them
  • How to use the Immediate window
  • The (common) Run, Debug, & Tools menu options

After reading this, you’ll be ready to begin focusing on learning to code!

How to enable the Developer tab in Excel 2007 and up

  1. The first thing you need to do to access the VBA editor in Excel is to enable / display the Developer tab. To do this, click the Office circle or the File tab and click on the Options button.
  2. Click on the Customize Ribbon option on the left hand side of the window.
  3. Ensure that the check-box is selected for the Developer option on the right hand side.
  4. Excel_Ribbon_Options

  5. Click the OK button.
  6. You should now see the Developer tab appear on the right hand side of the Ribbon bar.

How to access VBA code and where to store your code

  1. Once you have access to the Developer tab, select it and then click the Visual Basic button on the right hand side in the Code section.
  2. Excel_Developer_Ribbon

  3. This will open up the VBA editor window.
  4. On the left hand side, you will see a basic Project tree structure that shows the different worksheets in your workbook, as well as any code modules, or other Excel objects. On the right hand side, you will see the basic (probably empty) code window where you can write VBA code.
  5. Typically, I like to create one or more modules for storing my code. I will usually have one module for my main code routine, one for any functions I may call, and one or more for large subroutines. How you structure your code is up to you. You can also store your code in the specific worksheet that you want to call it from.

Excel_VBA_Window

Excel_VBA_Insert_Module

How to access the VBA macro recorder and why it’s useful

  1. On the Developer tab, there is a VBA macro recorder.
  2. Excel_VBA_Record_Macro

  3. Clicking on it, Excel will prompt you for what to call the macro and then will begin to record (in VBA code) all the clicks and keystrokes that you make as you manually update your worksheet.
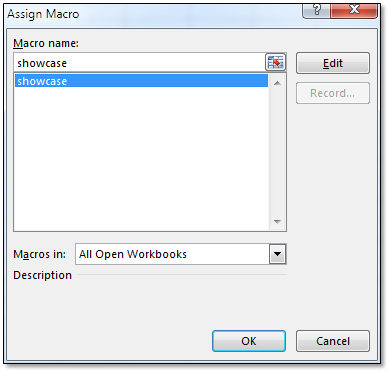
  4. Excel_VBA_Assign_Macro

  5. This can be extremely helpful to help you quickly prototype basic code, or to figure out what the options are for using VBA to manipulate your worksheet. For example, you could manually apply a filter to a Pivot table, then see what the macro recorded to figure out what the code is for doing this programmatically.
  6. The macro does have limitations – for example, it won’t construct any code to iterate through a job. It will construct code to do the action over and over (i.e. copy the code multiple times, potentially making for a HUGE amount of code, but you will need to learn how to build a If, For, or When loop to iterate through the action multiple times.
  7. When you click the Stop Recording button, it will save the code to a new code module in the VBA code editor.

How to insert buttons in your spreadsheet and assign code to them

  1. You can add a button to your spreadsheet that when clicked, will run specified VBA code.
  2. To do so, click the Insert button in the Controls section. Click on the square box icon in the Form Controls section. Then click and “draw” a button where ever you want it on your spreadsheet.
  3. Excel_VBA_Form_Controls

  4. As soon as you finish drawing the button, Excel should prompt you to assign a macro to the button. All subroutines that you have created in the VBA editor should appear in a list, available for your selection.
  5. Excel_VBA_Button

  6. You can right-click on the button and choose to edit it, this will allow you to edit the text on the button as well as move it.

How to use the Immediate window

  1. Going back to the VBA editor window, sometimes when you run code, you just want to see the output right away and not have it affect anything in your Excel spreadsheet. This is especially useful for debugging code.
  2. In the example below, a subroutine called showcase defines a variable num as an integer value and then assigns the value of 2 + 2 to the variable num. Then, using the Debug.Print function, the value of num is displayed in what is called the Immediate window (i.e. the value of num is 4).
  3. Excel_VBA_Immediate_Window

  4. If the Immediate window is not visible, you can quickly display it using the shortcut key

The (common) Run, Debug, & Tools menu options

The following is a synopsis of the Run, Debug, & Tools menu options:

The Run Menu

Excel_VBA_Run_Menu

  1. The run menu gives you access to the play, pause, stop functionality of running your VBA code.
  2. The most useful thing to note here is if you click on a subroutine or function with your mouse, you can then use the F5 key to run that specific subroutine.
  3. Also note, if you run code and it breaks, prompting you to enter debug mode, the way to exit debugging is to use the Reset button

The Debug Menu

Excel_VBA_Debug_Menu

  1. When you finish writing your code, click the Compile VBAProject button. Compiling converts the code written in the editor into code that can be read by the Windows run-time environment. If you don’t compile your code, than it is automatically done when the code is run. If the code won’t compile then it needs to be debugged and won’t run until it is fixed.
  2. The other useful thing to note here is the Step Into (F8) option. This allows you to step, one line at a time, through your code.

The Tools Menu

Excel_VBA_Tools_Menu

  1. On occasion, some of your code may require access to other VBA functions that are not typically in Excel. For example, you run VBA code in Excel that also programmatically manipulates something in Outlook or Word. You will need to add a reference to the Outlook or Word functions by using the References option available here.

Hope this helps!
Questions? Comments? As always, let me know in the comments below.

Generating random sized test files


I haven’t posted in a while & had to use this tip today so I thought I would share!

I’m testing a Google site that we built for a client – we have a javascript that runs a form to upload a file to a Google Drive folder and we wanted to see what the max size file we could upload to the site was.

In order to quickly generate any size file, you can use the MS-DOS utility fsutil. The syntax is as follows:

fsutil file createnew <name of file> <size in bytes>

Works like a charm! 🙂

If this helps you, let me know!

Project Date Calculations in Excel


A relatively common demand management question I’ve been asked to solve in Excel numerous times is how do I figure out how much time is a person allocated to a project during a certain month?

The answer is relatively simple but requires a visual aid to help figure out the logic of the different scenarios:

Project Date Scenarios

As you can see – there are 4 cases that can occur. Our goal is to write an IF statement that models all of these scenarios.

Ta Da! Here you go:

=IF(AND([Project Start]<[Month Start],[Project End]>[Month End]),1,
IF(AND([Project Start]<[Month Start],[Project End]<=[Month End],[Project End]>=[Month Start]),(NETWORKDAYS([Month Start],[Project End])/NETWORKDAYS([Month Start],[Month End])),
IF(AND([Project Start]>=[Month Start],[Project Start]<[Month End],[Project End]>[Month End]),(NETWORKDAYS([Project Start],[Month End])/NETWORKDAYS([Month Start],[Month End])),
IF(AND([Project Start]>=[Month Start],[Project Start]<[Month End],[Project End]<=[Month End]),(NETWORKDAYS([Project Start],[Project End])/NETWORKDAYS([Month Start],[Month End])),0))))

Let's break this down line by line.

=IF(AND([Project Start]<[Month Start],[Project End]>[Month End]),1,

translated is case #1 and it would give us a full 100% allocation during that month.

IF(AND([Project Start]<[Month Start],[Project End]<=[Month End],[Project End]>=[Month Start]),(NETWORKDAYS([Month Start],[Project End])/NETWORKDAYS([Month Start],[Month End])),

translated is case #2 (Project End is either before or equal to Month End), we then find the number of work days between month start & project end and then divide by the number of work days in the month to find the percentage of allocated time.

IF(AND([Project Start]>=[Month Start],[Project Start]<[Month End],[Project End]>[Month End]),(NETWORKDAYS([Project Start],[Month End])/NETWORKDAYS([Month Start],[Month End])),

translated is case #4 (Project Start is after Month Start and before Month End, find the number of work days between Project Start and Month End divided by the total number of work days in the month.)

IF(AND([Project Start]>=[Month Start],[Project Start]<[Month End],[Project End]<=[Month End]),(NETWORKDAYS([Project Start],[Project End])/NETWORKDAYS([Month Start],[Month End])),0))))

translated is case #3 (Project Start is after Month Start and before Month End and Project End is before Month End, find the number of work days between Project Start and Project End divided by the total number of work days in the month.)

Using this formula, you can find (per month, or any other given date range such as an entire year) what percentage of time the project takes up within that date range. This percentage can then be used to calculate number of hours, cost of project, etc.

If you have a specific use case you are interested in getting help with let me know!

~Yosef

Help! Why won’t my Excel formula calculate?!


Note: These instructions are based off Excel 2010 but are applicable for Excel 2007 through Excel 2013 (Office 365).

Has someone sent you a spreadsheet or perhaps you’re working on one and all of a sudden your formulas look like formulas and won’t calculate? Here are the top solutions I have come across for fixing this common error.

  1. Cell text formatting is set to “Text” – If the formatting of the cell has been set to Text instead of General or some other format, the cell will not calculate because it assumes that anything in the cell is text and not a formula. Change the formatting of the cell by pulling down on the drop down in the Number section on the Home tab of the menu ribbon
  2. Excel Number Format

    Excel Number Format Expanded

  3. Show Formulas (Ctrl + ~) has been selected / pressed – If the Show Formulas option has been selected, calculations will show their full formula and not show the calculated results. To toggle back and forth, you can either use the hotkey combo Ctrl + ~ or select/deselect the Show Formulas option in the Formula Auditing section (I highly recommend learning to use all tools in this section when troubleshooting Excel problems!) on the Formulas tab of the menu ribbon.
  4. Excel_Formula_Auditing1

  5. An apostrophe (‘) has been placed before the equals (=) sign – Typically someone will have done this on purpose, however placing an apostrophe before a formula will make the cell mimic the first solution listed above where the cell formatting is set to Text. Remove the apostrophe to force the cell to calculate.
  6. Excel_Apostrophe_Formula

  7. Automatic calculation of the worksheet / cell has been turned off – If you’ve been sent an Excel sheet that’s very large, sometimes people will turn off automatic calculations so that the spreadsheet doesn’t break your computer upon opening it. To turn on or off automatic calculations within your worksheet, click on the pull down menu of the Calculation Options in the Calculation section of the Formulas tab on the ribbon bar. Alternatively, this setting can be reached by going to the File tab, selecting Options, going to the Formulas tab and then setting the Calculations options there.
  8. Excel_Calc_Options

    Excel_Calc_Options2

Hope this helps when you get stuck! I would appreciate hearing if anyone has come across other solutions to this common complaint?

~Yosef

Managing SharePoint List Permissions


I typically don’t do a lot in Microsoft SharePoint, however on my current project I’ve been working on building out a little site that has required learning some new things about it. In particular, I had a main site, with multiple lists on the site. I also have multiple groups of people setup and I wanted to ensure that each group can view the main site, but then can only view their specific list.

So it turns out that if you create a group at the site level than it automatically overrides permissions at the list level, even if you tell a list to not inherit permissions from the parent site. What you have to do is create a group at the site level but do not select any of the permission levels, just create the group without any permissions. This will create the group with “Limited Access” permissions that does not allow them to view or do anything.

Then, you go to the specific list you want to grant the group permissions to and add the group there, granting them permissions directly at the list level. In my case, I gave them “View Only” permissions because it allows users to view lists and look at documents attached to the list.

Finally, in order for users to view the main site (but not any lists below the main site), create and add them to a Visitor’s group that you grant “Read” permissions too. This restricts them to view the site, but not view any lists (besides the specific ones you grant permissions too).

Hope this helps!

The two Microsoft help articles I referenced are:

Remove users and groups from site access – Windows SharePoint Services

Customizing user access to a SharePoint list or library – SharePoint Server

Excel: How to use the INDIRECT function – Example


I received a request for a follow-up post to my last post on how to use the INDIRECT function in Excel. The request was to create a sample table showing a potential setup and use of it.

The best use I’ve found for the INDIRECT function is to build dashboards. You can have all your data stored on one sheet and then use INDIRECT formulas in combination with others to pull over only the data you want in a quick and easy manner.

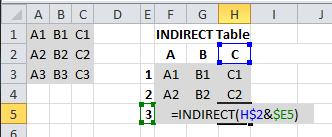
In the picture below, there are two sample tables. The one on the top left is my “Original Data Table” which could be stored on any tab. The “INDIRECT Table” on the right uses INDIRECT formulas to pull over the data from the first, original table.

INDIRECT1

Remember that the INDIRECT formula takes in a text string and converts it to a cell reference. In this case, I put my column references as table headers and my row references as row IDs for my INDIRECT table. In this second picture, you can see how I combine the column reference & row reference in my INDIRECT formula to create a formula that is easily copied over to all the other cells in my table.

INDIRECT2

With properly setup column & row references, I need only write a single INDIRECT formula to pull over all my data in the correct order. I could just have easily made it skip every other row or skip a couple of columns, or even reorder the columns or rows by reordering my column & row references. My INDIRECT formula wouldn’t have to change at all!

Hope this helps! Let me know if you have any further questions.

Thanks!
~Yosef